Adventures in making
There is a recurring joke about how the longer you work as a programmer, the stronger the urge to quit the industry and go live in a farm. I'm not at that point yet but I do have a soft spot for making physical things with my own two hands that, no matter how crooked, I can hold proudly and say "I did this". It is no surprise then that I'm a fan of the Maker Movement, the idea of figuring out how to do stuff on your own rather than purchasing it. I've been using my free time this year to build quite a lot of stuff, and yet 3D printing is the only one I wrote about.
Today's post is an attempt at remediating that. I don't expect you to like them all, but if you're looking for a new hobby then here's a list of hobbies a nerd can enjoy.
Drawing
I have a problem with drawing: I've been doing it for long enough that I'm objectively good at it (no just "good enough", but "good") and yet without a project at hand I just... don't. I had some success with small comics I drew during particularly depressing meetings and I've been chasing that high ever since.
A friend and I are currently looking into writing a comic together, so hopefully I'll have more to tell in the coming months. I would have liked to join a comic contest as our North star, but those are hard to come by when you're an adult.
I don't want to write much more about the topic because I already did it once.
Painting
I started taking painting classes about a year ago after realizing that you can learn from videos how to add purple shadows to portraits but you can't ask why you are adding purple shadows to pink skin. My drawing skills have helped with the first steps, but becoming the next Rembrandt will still take a while.
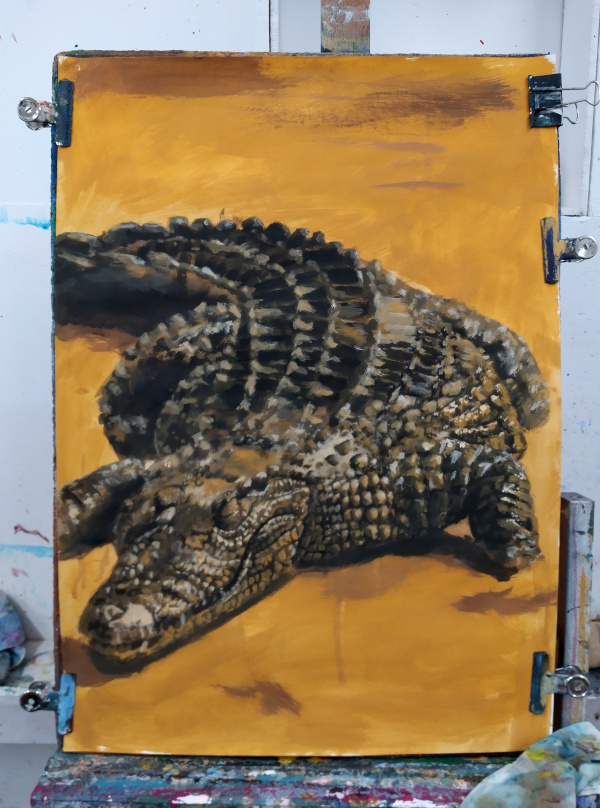
My main shock about painting was the stark difference between me just "going with it" versus having a specific goal: I can get good results whenever I paint for fun (or, more accurately, when following the tasks my teacher gives me) but getting a precise result is still a lost cause - the least I care, the better the result. And while I understand why this happens, I don't yet have a working solution.
My current main challenge with painting is the cleanup: I still haven't processed the trauma of that one night when paint splashed everywhere and I spent the next hour on my knees chasing tiny paint spots on the floor of my rented apartment. I know I can't get better without practice, but sometimes the apprehension is just too much.
Sewing
I have a general rule: if I face the same problem three times, and the problem is salient enough that I remember all three occasions at once, then I need to figure out how to solve it for good. October found me in this specific situation when I realized that I had
- One nice shirt that's too big for me,
- One summer shirt that's too big for me, and
- One summer hoodie design that I've been wanting to have for almost twenty years.
My first idea was to learn sewing by hand. I wouldn't recommend it as a long-time strategy, but hand-making my own sweatshirt taught me a lot about why a sewing machine does what it does and when is hand stitching the faster, simpler alternative.
The next natural step was to get a sewing machine. The one in my local library is eternally on loan, but luckily second hand sewing machines in my area are surprisingly cheap. The difficult part was finding a good first project: I checked every beginner book in every library I know, and yet all of them start with projects like a skirt, a top or a dress, none of which would be very useful for me. In the end my hand-sewn sweatshirt had to be redone when the material failed to shrink as promised and having to redo all of that gave me some good practice.
Having now resized one shirt, one t-shirt, one sweatshirt and having made a summer hoodie from scratch I believe I'm ready to tackle the nice shirt. I've been toying with some stupid ideas after that, but whether they end up being fashion or cosplay I cannot say.
Music
I never really stopped playing music, but my piano skills have not evolved much in the last ten years. Fate put recently an old guitar into my hands for repair, and this gave me a good chance to give the habit a bit of a refresh - I learned how to play guitar when I was 12, and I am glad to report that I still keep the muscle memory.
The weird part was singing - I stopped playing guitar because I was really bad at singing, and yet I am now at the point of my life in which I get to understand two things:
- Singing is not that difficult once you understand that your voice and the music have to follow each other
- As long as your singing isn't atrocious, no one really cares
I tried to write an app for showing a song and its corresponding tab, but the problem is harder than I thought: the whole song doesn't fit in a phone screen, you cannot click the screen to move on (both your hands are busy), and coordinating the text and music automatically is a tough problem. I considered real-time speech detection, but I'm not sure there really is interest for that as guitar players are notoriously uninterested in formalizing their art. I'm currently sticking to the tried-and-tested hand-written booklet until I find a better solution.
Penmanship
On the summer of 2002 I stopped writing cursive - I was taking my first Math courses and realized that formulas only make sense in block letters. My block handwriting declined steadily until 2014 when I decided to do something about it, but cursive remained forgotten until last year.
It was quite shocking to realize that I no longer remembered how to write some uppercase letters, particularly one that's part of my own name. I therefore made a conscious effort to start writing cursive more often, I looked into different types of scripts, and nowadays my cursive is nicer than it ever was - I'm still not as good as some teenage girls I know, but I'm getting there.
Make-up
I have no interest in wearing make-up on my day-to-day - in fact I wish less people would do it. But during Halloween, Karneval or similar? If you think of it as "applied painting" it turns out to be a lot of fun.

I believe my skull makeup is on point (I really need to find a new tube of cracked-skin white base) and my Picasso was also not that bad, but where to go from there is harder. I tried checking in social media, but the most interesting ones are meant for the camera and fall apart the second you look away. Latex prosthetic seem promising, so I'll probably be trying that for next February.
The way forward
I have a couple ideas I want to try next year. Sculpting in wax seems fun (messy, though) and woodworking (even messier) has definitely made it through my "three problems" threshold. And if I had a backyard you can bet I'd have a project boat underway - did you know you can just download instructions to make one?
I won't pretend that I'm particularly good at most of these hobbies, but I am fine and that's what matters. Mastery is a life-long process, but making your own t-shirt takes a couple days (about a week if you want welt pockets).
So go ahead and give any of them a try. Write a comic on post-its, draw a bad portrait, play some chords on a guitar and make a wax tiki lamp. Programming is a lot of fun, but remember that specialization is for insects.