DIY Tumbler skins, the math way
I always associated the word tumbler both with Batman's car in Nolan's movies and with that one website. It turns out that there's a third definition: a tumbler is also a glass, and in particular it is the name for those plastic cups for hot drinks (i.e., coffee) that people carry with them sometimes. They are more or less good for the environment, which is why I ended up with one.
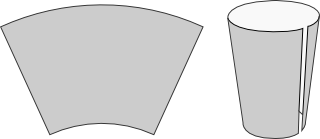
The one I have allows me to change its decoration in a simple way - all I have to do is unscrew the base, remove the current one and replace it with something else. And here is where things become interesting: my tumbler is not shaped like a cylinder, but more like half a cone. Wikipedia calls this figure a frustum, and when you flatten it you end up with a template like this:
So let's say I want to put my own drawing in this format. One could naively make the design, cut it out in the shape of the template, and put it in. If I did this, the entire design would look weird, because the base is smaller than the top, and that messes perspective up in several ways. Luckily, with math we can make it look nice.
Now, before we start, I'm going to give you the summary: if you want to use your own image, make sure that it's size is 21.26cm x 17.43cm (or proportional to that) and then use ImageMagick to run the following command:
convert input.jpg -virtual-pixel White --distort Arc 16.56 output.jpg
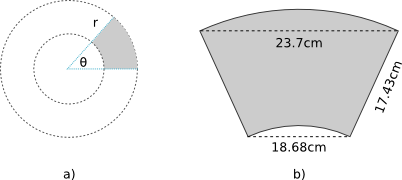
So that's out of the way. But where did those numbers come from? Well, let's dust our rulers and take some measurements. I'm going to assume that the template is a slice of a circle with radius (r), like Figure a) shows. Figure b) shows the measures I could obtain accurately. Those are the numbers I got but, of course, if you have a different model your numbers might be different:
These are easy measures to take, but it doesn't tell me anything about the two main measures I need: the perimeter of the template, and the angle between the non-parallel sides. Why do I need this?
- Measuring the perimeter will allow me to reconstruct the aspect ratio of the original picture. In case you don't know, "aspect ratio" is the relation between the width and the height of an image. Using the wrong one would mean that I'd have to either add black bars to the final design or crop it's sides, and I don't want to do that.
- The angle between the sides will let me deduce at which point both of them would intersect, which I need to calculate (r). Given that we are assuming the template is part of a circle, that would tell me where the center of the circle is.
So let's get down to it. By taking our measures, we can build a trapezoid like the one shown in figure c), along with some names for each side (le=long edge, se=short edge, s=side). Some simple math lets me deduct the lengths for all the relevant sides in figure d), but no angles yet. To get that, we'll need some trigonometry.
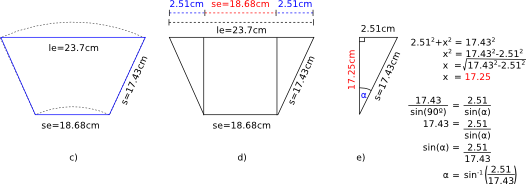
Let's cut a triangular slice of our figure. We know the length of two sides (which we use to obtain the third via Pythagoras's theorem), and we also know one of the angles is 90 degrees, or (\frac{\pi}{2}) radians. Using my favorite identity, the Law of sines, we can deduct the angle (\alpha) (see Figure e), which is almost the one we wanted: looking at Figure f), it is clear that (2\alpha) is the angle between the non-parallel sides.
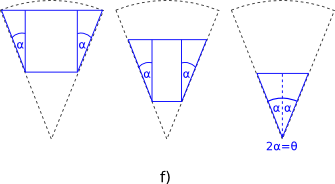
So now let's see if we can get the length of the largest curved side of our tumbler. There are some weird ways of obtaining this value, but this is the simpler one: we know already that (2 \pi r) gives us the full circumference of a circle. But we don't want the full circumference, just a small piece of it - more precisely, a piece with an angle (\theta = 2\alpha).
Now that you got the basic idea, this is what I'm doing next:
- Make a triangle with angle (\alpha) similar to the previous one, but one that goes all the way to the center of the circle. Note that the sides are now larger, but the angle remains unchanged.
- For this new triangle, its length (s) equals the length (r) (which we don't know yet) and the length of its shorter side is (\frac{le}{2}).
- Having two angles and one side, I'll use my favorite identity again to calculate the length of the unknown side (s) (which equals (r)).
- The end result is that (r = 82.29cm).
Cool! Now that we have (r), we can obtain the circumference of our circle. If we obtain the circumference only for an angle (\theta), we get the length of the long curved side, which is 23.78cm, and the length of the short side, which is the same calculation but subtracting (s) from (r). That tells us the shorter curved side is 18.75cm, and now I have all the measures I need to properly draw and deform my picture. Imagine for a second that our original picture is made of rubber, and we deform it until it looks like the shape of our tumbler's label. Then the top of our picture would be stretched, while the bottom would be compressed. So if we want to know how wide was our original picture, we want to check right in the middle of the picture, which is the only part that would not be deformed. That length is 21.26cm (i.e., the average between both sides), and now that we know our original picture was 21.26cm x 17.43cm, we can divide and get a frankly terrible ratio of 1.219, which is the aspect ratio we need for our pictures to fit just right.
So that's that. We now know how to properly set up our original design, and we have all the numbers to deform it properly, but how do we actually deform it? Well, as I'm a GNU-Linux guy, I'm going to go ahead and suggest you use ImageMagick. More specifically, the command I mentioned at the beginning of the article - although now you know why your picture needs to be a certain size and where the value of (\theta) comes from.
And just like that, we have our picture ready to be printed. Make sure that your picture is printed exactly 23.7cm wide, pick some scissors, and you now have a perspective corrected, formally verified new tumbler skin.
